Gilgamesh 2
Gilgamesh 2 is a Secret Boss that is fought in the Arena of Darkness. After he is defeated there, he will also show up (but only in his final form) in the Dimensional Cup, under the team named Planeswalker. Once he has been encountered once, he is available to summon any number of times through the fourth Battle Organizer (knight). With the Arena Completionist chronicle, you can also unlock him in the Battle Arena right at the start of a new game. And he can also be fished up after fighting him in the Arena of Darkness which rewards the Lu Shang rod.
Gilgamesh 2 (in the Battle Arena) is a popular choice for completing the Test of Strength requirement for Legendary Master promotion. See the linked page for how to beat him solo with different classes.
How to Summon[]
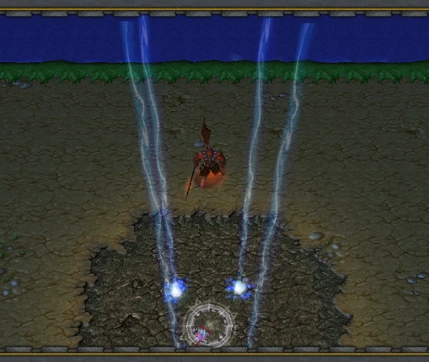
Do the The Bridge-Battle quest. After you obtain Excalipoor by beating Gilgamesh, take it to the bottom right area of the map and put in on the circle of power in the Arena of Darkness. Gilgamesh 2 will teleport to you, say that he has waited so long to fight, and the fight will begin.
Fight Mechanics[]
In the Arena of Darkness, Gilgamesh 2 is fought in 4 different phases, starting with his most defensive phase where he has shield and armor gear to his offensive phase where he wields 4 swords. At the start of each phase, he regains full HP, casts Holy, Protect, Shell, and Haste. Furthermore, at the start of phase 1 he will also summon Enkidu. Gilgamesh 2 has a variety of spells, the most dangerous of which are Mineuchi and Tatsumaki.
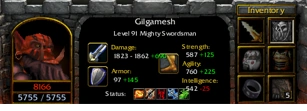
Phase 1: Excalibur II, can cast Holy

Phase 1 Items
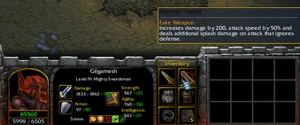
Phase 2: Explosion Sword, grants Splash Damage

Phase 2 Items
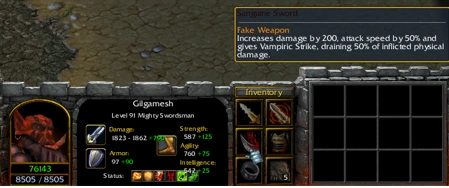
Phase 3: Sanguine Sword, grants Lifesteal

Phase 3 Items
Phase 4: Demi Sword, grants a weak Demi Strike

Phase 4 Items
Strategy[]
Counterfeit Magic (0.9.7.3 Inferno)[]
Hero: Ranged Agility Freelancer - Haste, Slow, Shock, Immobilize
Equipment: Lion Heart, Pulsar Shot, Genji Mask, Genji Armor, Stopwatch, Dispel Tonics
Spirit of Gaya: Ice Wand, Tome of the Breaker, Spiced Salad x5
Fight:
The idea is simple: begin by using Immobilize at the beginning of each phase and use that time to cast Slow, Ice, and Shock. The most important part is to get the timing between Shock and Immobilize in sync to keep Gilgamesh 2 slow so he cannot hit you. If you ever mess up the timing, run until you can cast Immobilize again followed by Shock and your other slows. Keep up your mana with Greater Nectars and use Dispel Tonics after each phase to make the fight go quicker.

FFERPG 0.9.7.3 Inferno Gilgamesh 2 Solo Freelancer-2
Video of Fight, NG10
Poisoned Arrow (0.9.7.2 Inferno)[]
Hero: Archer - Switch Aim for Scourge
Equipment: Artemis Bow, Shock Arrows, Genji Mask, Genji Armor, Cameo Belt, Greater Nectars
Spirit of Gaya: Tome of Agility, Tome of the Breaker, Tome of Time, Demiga Materia
Fight:
The main idea is the never let Gilgamesh 2 touch you directly as he becomes much stronger with each subsequent blade. Cast Haste before the fight starts, and 2 wolves. As soon as Gilgamesh 2 is summoned, cast Scourge and Slow on him, and quickly kill Enkidu. Then, just maintain Haste, Slow, and Scourge and keep hitting Gilgamesh 2; keep summoning wolves while this is happening. Be careful from the 2nd phase onwards to not stand in direct line with the wolves as the Explosion Sword gives Gilgamesh 2 a splash attack that can easily kill you. Be careful of Tatsumaki as it can easily pull you towards Gilgamesh 2 and lead to your death.
At the start of each phase, he will dispel all previous debuffs on him. As such, it is crucial that you have Scourge and Slow ready to go as otherwise he can rush you and kill you. This is where having wolves to distract him can help a lot.
This same strategy can work even with lower level gear, though it will take longer to kill Gilgamesh 2.

FFERPG 0.9.7.2 Inferno Gilgamesh 2 Solo Fight-2
Video of Fight, NG10
Witchcraft (0.9.7.2 Inferno)[]
Hero: Intelligence Freelancer - Flare, Slow, Cripple, Oil Barrel
Equipment: Final Wand, Holy Book of Galbados, Circlet, Robe of Lords, Cameo Belt
Spirit of Gaya: Tome of Agility, Tome of Phantasm, Magus Rod, Demiga Materia
Fight:
The idea is very similar to strategy 1: do not get hit. Simply spam all of your slows on Gilgamesh 2 and he should be unable to reach you with his own hero. Without another unit, he will not cast Tatsumaki and as such the only time you need to be careful is at the start of a phase. If you find yourself dying at the start of a phase, call forth a summon from the Tower of Summoning near the end of a phase to tank at the beginning of the next phase.
Rewards[]
Drops - Genji Armor, Genji Mask, Genji Gloves, Curse: Masamune, Samurai's Amulet, and a Crystal Shard
Battle Arena - Unlocks the Planeswalker team in the Dimensional Cup of the Battle Arena
Fishing - Allows Gilgamesh 2 to give the player Lu Shang when fished with the Matamune